How to research gear
Hey guys!
Being the productivity nerd I am, in this blog post I’ll be sharing my tips about how to make the research of backpacking gear as simple and efficient as possible and help you to save time and money.
These tips can be applicable to researching anything - I use the same technique while researching photography gear, for example.
I’m a solo backpacker, and it means I can only rely on myself and my own gear in my trips. It took me quite some time to get proper gear - and I’ll be sharing my process with you.
To start off:
1. Get a gear list
First things first - you need a list of all the gear necessary for backpacking.
You’re most welcome to use my packing checklist as a base - it has absolutely all the items I take with me while backpacking.
Make a list of items you need to buy - that’s what you want to research.
2. Sort the list by priority - what you want to research first
As I said in my previous blog post,
7 Tips How To Start Backpacking, you might want to start with items that tend to cost more - these would be a tent, a backpack, sleeping bag and sleeping pad.
Now, for each item from the gear list, here’s how I research:
Step 1 - Find out what the market has to offer
First, to be able to make the best choice, it’s important to understand what are the possible features and drawbacks that a particular piece of gear may have.
For this, it’s convenient to use websites that aggregate gear reviews and comparisons. I usually go to outdoorgearlab.com. They have lots of reviews of any possible gear related to outdoors, and they also compile lists of best gear in every category, like Best Tents of 2020.
Yes, usually the gear they review is the highest end and most expensive pieces, but we’re here just to find out what are the important features this gear may have, so we can later decide what are the features that are important for us.
Also, OutdoorGearLab reviews will point out some common trade-offs of a gear piece. For example, it made me discover that usually the more breathable the rain jacket is, the less waterproof it is. And that the really lightweight tents might be non-freestanding, something for me to pay attention to.
And in addition to that, you can easily get a feeling what is the price range of high end products is, and also what is their weight range.
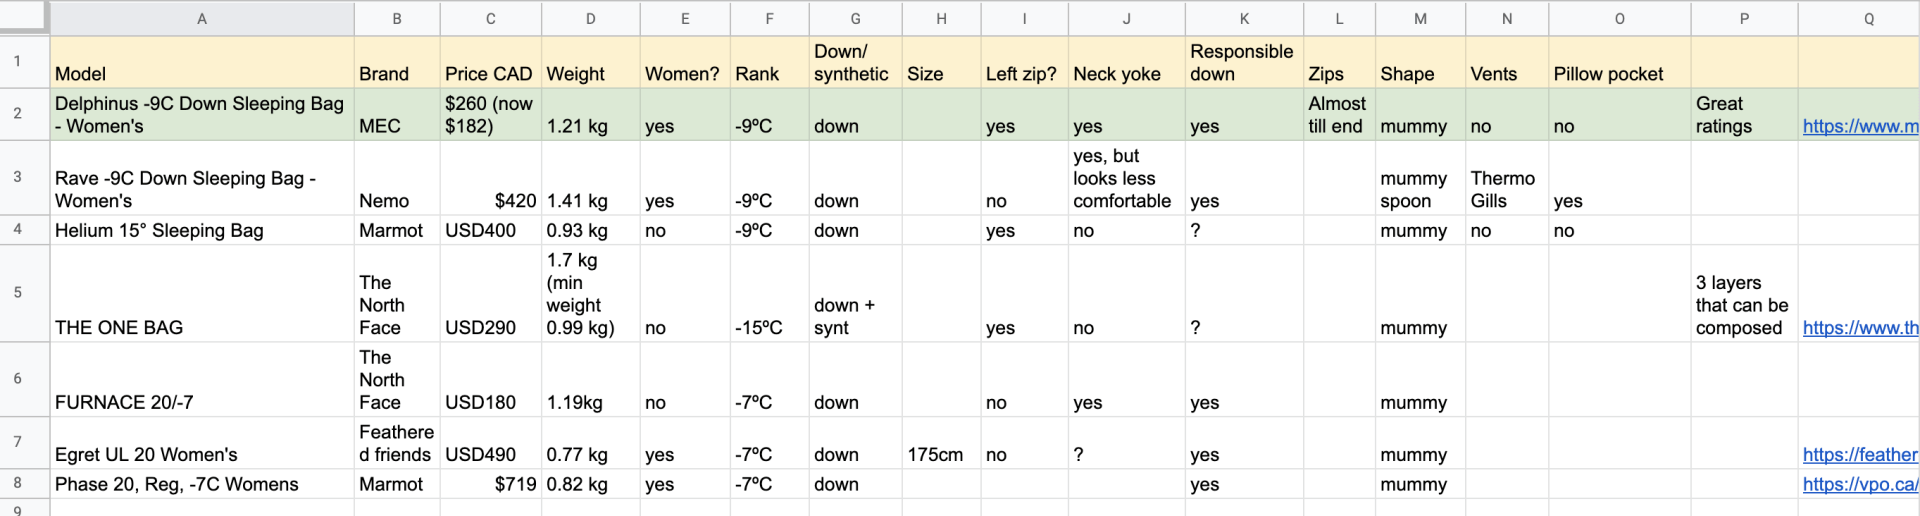
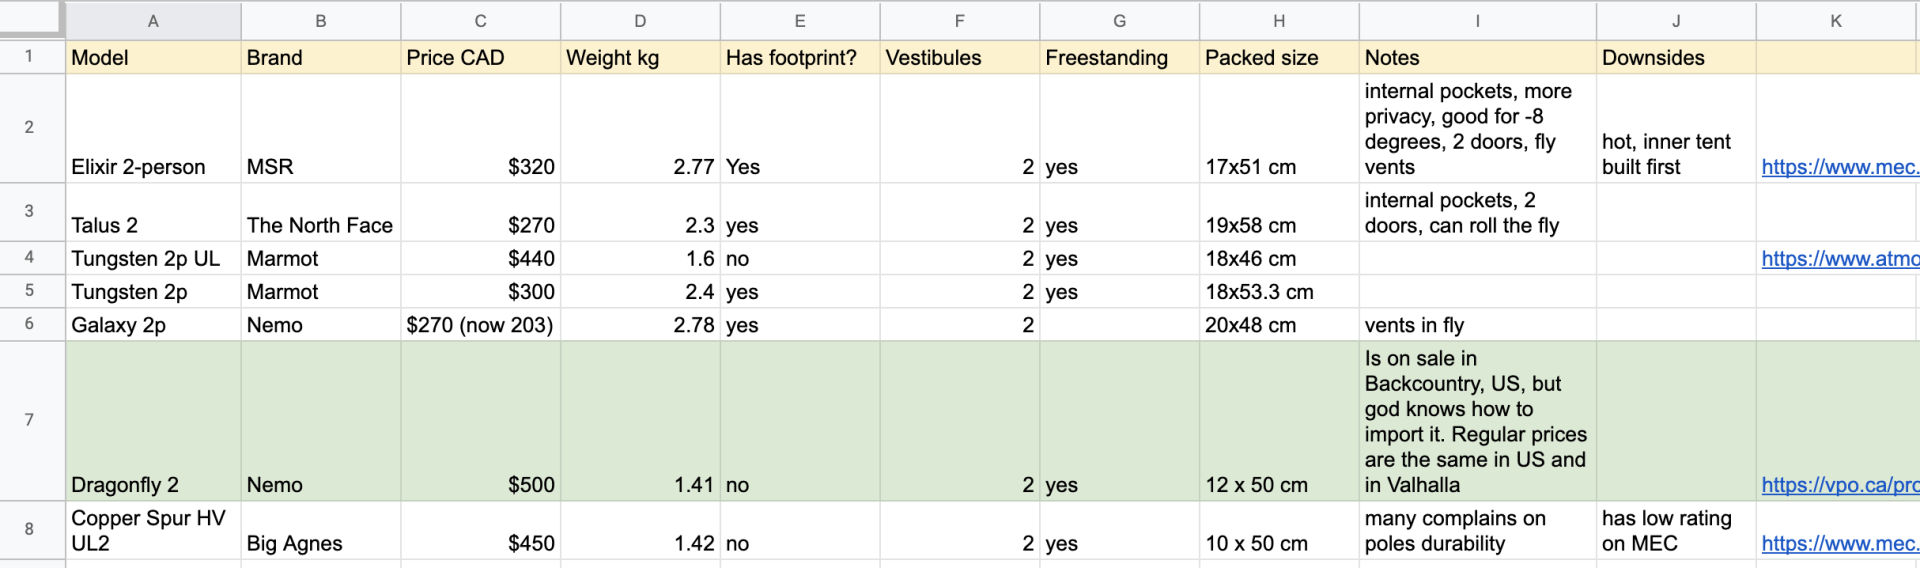
Step 2 - Create a table for each gear category
Create a google doc or similar. The columns would be name, price, weight, notes, link to product page and other various features of an item, and the rows - items to compare.
You can skip the features you don’t care about. For example, at some point I understood that a pillow pocket for a sleeping bag is not something I really care about, so I stopped checking for it in every sleeping bag I research.
Step 3 - add a couple high end products to your table
I usually add a couple of products from the “best gear blah blah” list, and I do this even when I know they are beyond my budget. The reason is that I want to have some kind of reference point of what performance should I get for that high price.
And if I come across a product that is priced just 30% less, but its performance seems to be about 50% lower, then I’ll know it’s probably not the best value for my money.
In general, I really recommend to save even the products that drew your attention, but you know you don’t want to buy. You can mark them as “rejected” if you want. Why? Because at some point you might come across this product again on some website, and chances are you won’t remember why you decided that it’s a sure no-go. So having this product already in your table will save you the time of processing it again.
Step 4 - Understand what features are the most important to you
As you will probably notice, the most high end products that have great performance and many bells and whistles, tend to be pretty expensive. So to save some money, we would want to make an educated decision - what features we absolutely need and which ones are nice to have.
For example, I was looking to replace my trekking poles since one of them broke. After researching the market, I realized that I can give up on the models that are folded into a z-shape - the folded length wasn’t a big deal for me as I would carry them strapped to the outside of my backpack, anyway. Telescopic poles are generally cheaper than the z-shape, so I could save some money on an unneeded feature.
Step 5 - Start shopping for options
Now you can start browsing online for the actual products. It can be outdoor gear stores websites, different brands’ websites, amazon, or whenever you can find such gear.
Each time you come across a product that you might consider as an option, follow these steps:
Step 1 - fill the item specs in your table
As I said before, I would strongly recommend that even if you quickly realize that you’re not going to buy this item, you still do fill it in the table
Step 2 - read reviews on this item
This one is very important. Pay special attention to the negative reviews - what problems does this product tend to have? Does it happen to many people?
Step 3 - write down the reviews summary in your table
So that you remember what people are saying about this product.
Step 6 - Choose the best options
Now that you have a table full of various options, choose one or a few that you think will fit you best and will be the best value for your buck. Mark them, and if you have time to spare - wait for these items to go on sale!
Hopefully this process will help you to have all the information in one place and you will be able to make the most educated decision and buy the gear that will highly improve your backcountry experience.
In case you're curious what gear I personally use, I have listed all of it with pictures, models and links in this blog post!
As always, you’re welcome to let me know what you think and ask any questions in the comment section below!
Cheers,
Oless